Wetter is Better

While working on a landscape for a forthcoming project at Ninjaneer Studios, I found that the animated reflections in some open water took prohibitively long to render thanks to a combination of the reflections and the diffused lighting of the scene. There had to be a quicker process that gave similar results, so I began investigating alternatives.

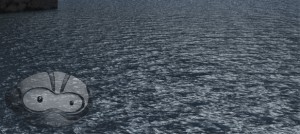
Render With Full Lighting and Raytraced Reflections

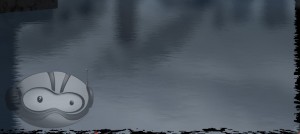
I found that Adobe After Effects has a filter called Displacement Map, allowing me to distort one layer based on another. One big drawback to this filter is the way it displaces, resulting in artifacts at the edge of the screen and other transparent areas where it attempts to sample data that is out-of-frame. This was easy enough to solve, but required some creative shot breakout.

Displacement Map (Note the ragged edges along the bottom and left sides)

Returning to Lightwave, I rendered out a reflection pass of the foreground elements. I changed the surfacing of the water so it was mirrored, deleted everything except the foreground elements, and set the foreground element to be unseen by the camera. This gave a pass consisting only of the reflection of the foreground, accounting for the perspective distortion in the reflection.

Thanks to the distance, there wasn’t enough perspective difference between the background and sky and their reflections to require a true reflection pass to be rendered, so I just reused those, flipped vertically. The clouds were a single panoramic plate, slowly receding, so those were likewise flipped vertically and layered into the basic reflection composite.

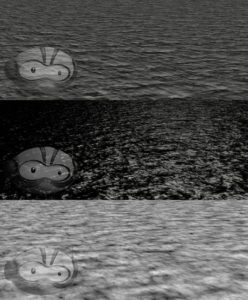
With the reflected version of the scene now created, all that remained was to make it look like water. I returned to Lightwave and rendered out basic diffusion and specularity passes from the original water object. To get the input for the distortion map, I created a duplicate of the water object and took surfacing in the bump channel and reapplied to to the color channel. After zeroing out the other channels and setting luminosity to 100%, I rendered it out, creating a shifting cloud pattern which corresponded perfectly to the diffusion and specularity passes I rendered earlier.

Diffusion, Specularity, and Bump Passes

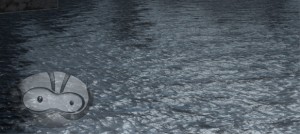
Back in After Effects, I brought these passes in and layered them over the reflection composite I had created. I hid the bump layer and added an adjustment layer between the reflection elements and the diffuse and specularity layers. I applied a displacement map to it and set the bump layer as the input. All that remained was to tweak the horizontal and vertical displacement to make the reflection appropriately wavy.

The Final Post-Production Reflection

A version of this post appeared on the official Ninjaneer Studios blog.

Charting the Crucible

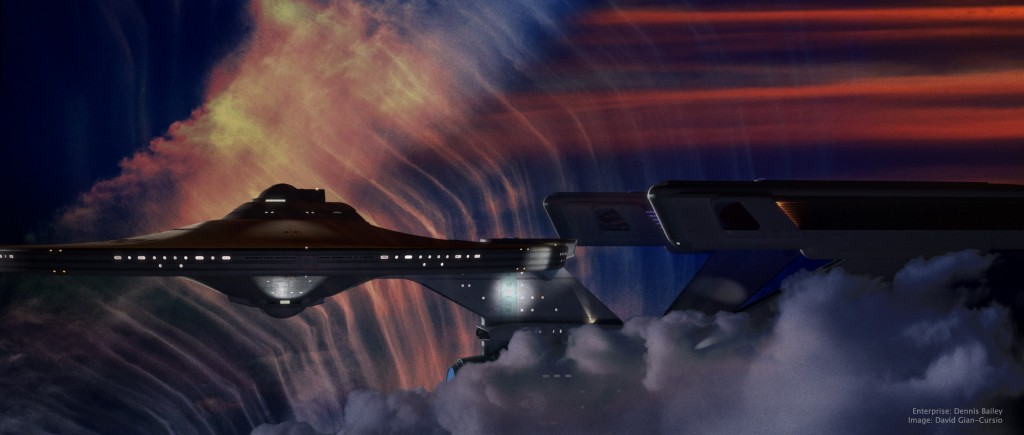
This picture was inspired by a shot in early season 3 of Battlestar Galactica, where Galactica emerges from behind a cloud in a nebula, looking for all the world like a seaship emerging from a fogbank. I decided some time ago that the movie-era Enterprise would be a perfect ship for my own take on the shot, given that it’s my favorite spaceship and that it’s long, sleek profile means it’d fit well in the aspect ratio I normally use.

The nebula background (and foreground) was a composite of four photos of clouds I’ve taken over the years (and anyone who’s ever seen me while I’m holding a camera can tell you that I photograph a lot of clouds), colored, mixed, and generally fussed with in Photoshop. I did a good deal of fiddling with the bloom and fog depth effects on the ship as well, until I was happy with them. I quite like the colors in this picture, and it’s one of my new favorites. And any day I can look at a picture and think “new favorite” is a good day.

As for the narrative of the image, all I can say is, it’s not from The Wrath of Khan. It’s a nice, peaceful image of the starship Enterprise exploring another, completely unrelated nebula. I know it looks like the nebula from The Wrath of Khan but, well, it’s not. Because I said so.


Added July 11, 2008

In light of the interest this picture has gotten, I’m putting up a quarter-sized version of the final Photoshop file, as well as the source files I used to create it, for others to examine for self-educational purposes.

On the nebula effects:
The first thing I did was put in the foreground cloud. I cut it out using a layer mask that I made from selecting the color of the sky, because there was a pretty clean division and I’m far, far too lazy to matte by hand when I don’t absolutely have to. I used an adjustment layer to give it it’s color, and then another photo of a sunset to break up its color a little. I used the same layer mask to block out these two layers, as well as the bloom layer for the ship.

For the bottom layer of the background nebula, I started with a light, whispy photo of clouds, with the opacity turned down a smidge so the black background layer would darken it up a little. Then came an adjustment layer the same color as the one for the foreground cloud, with this one set to “Linear Burn” in the blending mode to darken it up, and the “Blend if” box in the blending options being set to reduce the blending as the underlying layer got brighter. This set off the clouds in that picture more from the sky. I used the same sunset again to alter the color of this part of the clouds in the next layer up, this one set to “Vivid Light.” The topmost layer was another sunset photo, with smooth bands of red clouds, that I placed in the upper right to help justify the red light on the top of the ship. That one was matted in with a layer mask as well, with much tweaking of its levels so the red part would show up but not the sky behind it.

After I’d done all this, I still didn’t feel like it was quite done. Eventually, I realized what was missing and ran back to Lightwave to render out a depth pass of the ship using the Render Buffer Export. I used that as a layer mask on the ship layer, which helped sell that it was traveling through a gaseous medium (it’s most apparent where you can see the foreground warp engine overlap the background one, but it affected the whole ship.) The topmost layer was a merged version of the image, with a filmgrain-and-blur applied, and then darkened substantially with levels, and set to about 50% opacity.

—–

It took some doing to matte in the cloud without getting a black edge of what used to be sky. Even once I’d pulled that out, I found that the thick, full feel of the cloud completely broke with the thin, wispy clouds I used in the background. I didn’t really have a more suitable cloud, and didn’t want to render a 3D one for time and aesthetic reasons, and the composition didn’t work if I took it out all together, so I made it fit more with the background by giving it some of the same color variation. It still wasn’t perfect, but it served its purpose of framing the ship.

———-

On the appearance of the ship:
I think that feeling of solidity came out in Photoshop. The lighting was pretty basic, all told. The model’s rig, along with a small white area light at about ten o’clock for the rim light, a large red area light high and past the model, and a bluish area light behind and below the camera. (I also rendered the image with “Final Gather” radiosity enabled.)

Turning layers on and off, it seems that the CGI went away with the top layer, which was duplicate of the merged image, with film grain applied and the levels adjusted so the whole ship was almost entirely black, and then reduced it to 50% opacity.

How I used Lightwave’s Hypervoxels in “Bombardment”

For the vapor trails, I created a null and parented it to the shell (which I had already animated at its speed), and under the “Dynamics” tab of object properties added the “Emitter” FX. Under Generator I set a birth rate of 300 particles per second (the exact number depends on how fast your object is moving. You want enough so the trail isn’t a gap-filled dotted line, but not so many it’s just an opaque mess. Whether it’s measured by second or frame doesn’t seem to make a difference in how it behaves beyond the obvious, though I’m not sure how particles per “speed,” “collision,” or “wind” work).

The generator size is fairly self explanatory. Make it big enough to fill whatever the trail is coming out of, but not so big particles are appearing outside it in empty space. Particle limit controls when your emitter stops emitting, and start frame when it starts. Interestingly enough, two particle emitters with the exact same settings will spawn particles in exactly the same way. If you have, say, a multiengine airplane, it’s extremely apparent when it has identical vaportrails coming out of each engine, so you’ll want to have each emitter have a different start time.

Under the Particle pane, the only interesting thing is “Life Time(frame).” This way, you can set when old particles disappear and stop using up your valuable memory. I set it to 300 frames, +/- 0. Everything else should be set to 0, as well.

In Motion, “Velocity” should be 100%. I set “Explosion” to 5 m/s, so the particles would expand as the trail aged. I set “Vibration” to 5 m/s as well, so the trail would have a bit more life and randomness to it, instead of expanding uniformly.

Under the descriptively named Etc tab, I set “Position Blur” to 100, so the particles wouldn’t appear in neat little discrete clusters but smoothly along the trail, and “Parent motion” to .5% so the trail would ever-so-slightly follow the shell it was coming off of. For a rocket exhaust, I’d set this to a negative value. For an explosion, I’d set it to 100%.

And that’s the end of the particle settings.

After enabling hypervoxels, and activating my emitter null as a hypervoxel object, I set the object type to “Sprite” (“Volume” takes too long to render, and “Surface” is just a big blob). For “Dissolve,” I went into the texture control and created a gradient with “Particle Age” as the Input Parameter. I set it so the dissolve would be at 0% at 0 frames old, and 100% at 300 frames old (at which point, the particle emitter would remove the particle from the scene, clearing a space for a new particle to be created. It’s very “circle of life.”) Particle size was set to 7 m, and likewise had a Particle Age gradient so it would get bigger in time, maintaining the integrity of the trail even as the particles drifted apart from each other. One of the key things to remember is that each particle is just a little fuzzy procedural-textured circle, but as long as they overlap, they look like natural, organic clouds. Lift them drift apart, though, and the illusion is shattered.

“Shading” had every single channel described with a particle age gradient. “Color” had it start off the same yellow as the shell object, to represent its glow and flames, but faded to smoke gray within a few frames. “Luminosity” is, first of all, not actually equivalent to “Luminosity” in Lightwave’s surfacing system. It corresponds to the diffusion channel, a concept that gave me a bit of trouble before I figured out what was going on in my test renders. Likewise, the luminosity was set very high for the first few frames, and went downward gradually after that. “Opacity” seems to correspond to “Transparency” and “Density” to “Translucency” in the Surface Panel, but in reverse. So a perfectly clear object would have 100% transparency, but 0% Opacity.

I don’t know why the Hypervoxels shading panel doesn’t adhere to the conventions of the Lightwave surface editor but, then, I didn’t design that damn thing, and it seems to work well enough once you figure it out.

The shading panel also gives you the option to pick two lights that will be used on your hypervoxels, or to check a box to “Use All Lights.” To save render times, each vapor trail had the main sun light and its corresponding shell light selected. “Use All Lights” isn’t too bad for stuff like vapor trail, but a big smoke cloud in the middle of lots of lights like in this shot will kill your render times if you have “Use All Lights” turned on.

Hypertexture should be “Turbulence,” tuned to your standards of fuzzy cloudiness. Feel free to experiment on this. I certainly didn’t.

That’s about all I have to say without going so far as to offer a formal tutorial. Clear as mud, right? Maybe I should put the scene and object up for download, and you can look at it yourself.